Google Drive is an online file storage service that allows you to save your files and data over to the clouds. You get 15GB of free storage space, with an option to further expand this quota by purchasing a Google One Account. While there are already quite a few noteworthy names in this domain, the offering from the Silicon Valley giants has managed to take away much of the limelight.
Two major reasons for the same are its handy cross-device sync functionality and the integration of various Google products and services. Apart from that, there are a plethora of other useful features that it beholds, which we will make you aware of in our comprehensive coverage of Google Drive. So without any further ado, let’s get started.
All Best Features of Google Drive
Here are the Best Features of Google Drive for PC, Mobile, and Web
Uploading Files and Folders
Let’s get started with its most basic feature that’s also its USP. You could upload any file type (IMG, MP4, ZIP, PDF, DOC, etc) over to the Drive. Along the same lines, it also gives you an option to upload the entire folder as well.
There are two different ways through which an upload could take place. The first one is by dragging and dropping the file directly over to the Drive home screen.
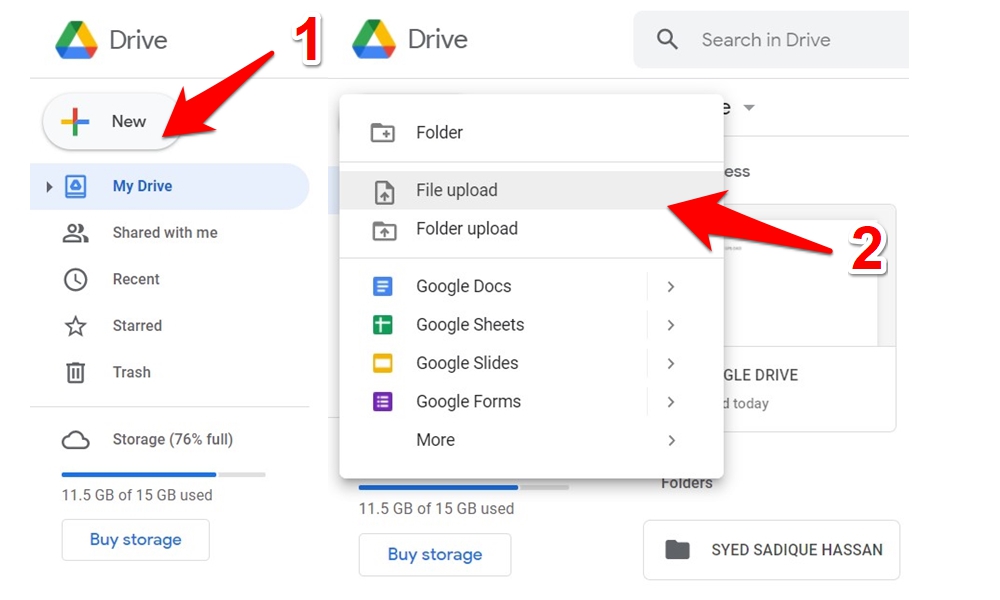
The other option is to click on the New button situated at the top left and then select File or Folder. After that, navigate to the desired file/folder, select it, and hit Open. The file/folder will now be uploaded over to the Drive.
On the other hand, if you are on your smartphone, then launch the Drive app and tap on the Plus icon situated at the bottom right. Then tap on Upload, browse to the file and select it.
![]()
Cross-Device Support
One of the major reasons why Drive is the preferred choice for many is its cross-device and sync features. If you upload any file over to Drive, then it could be accessed across all the devices that are signed in with the same Google ID.
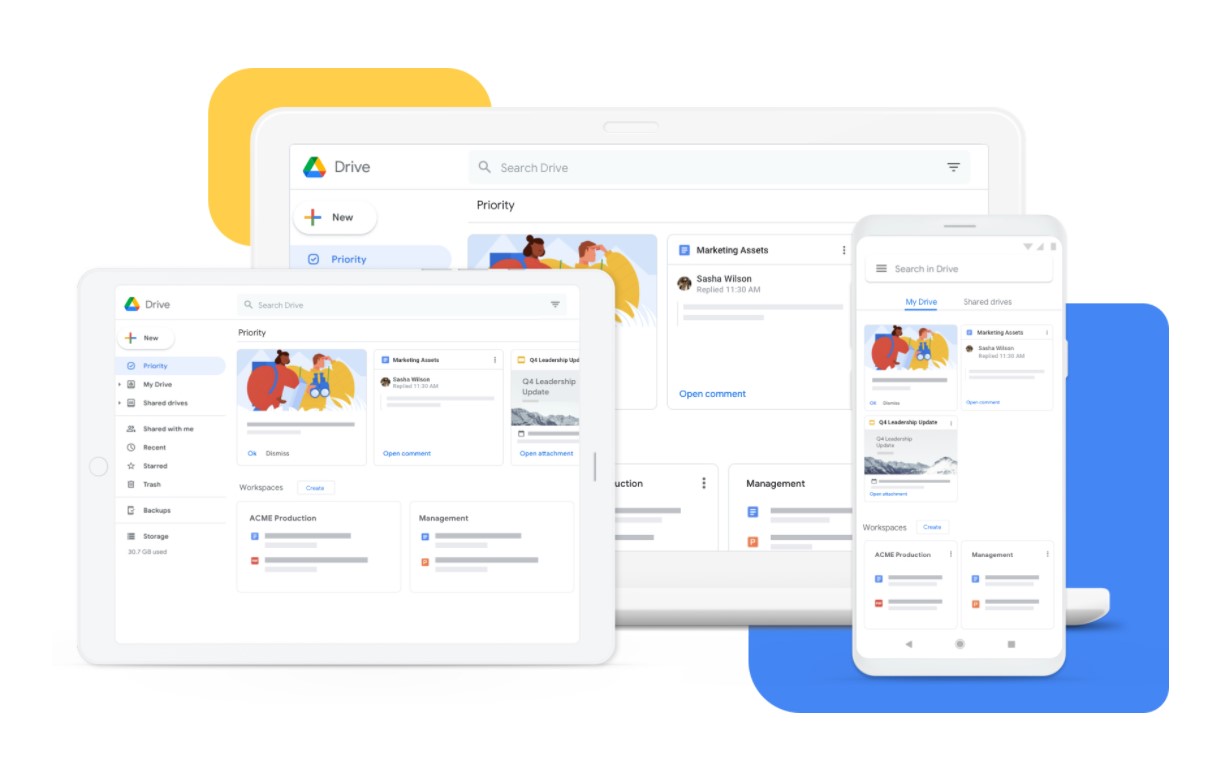
This means that any change you make across one platform will be automatically reflected on all the linked devices. So if you upload a file on Drive via PC, you could access it from your smartphone or tablet as well, granted they are signed in with the same account.
File Sharing
While this is one of its most important features, at the same time, it could well be the most complicated one for some. While file-sharing in itself is quite easy to execute, it’s the related settings that might make the matter complex for some. Let’s try and understand it:
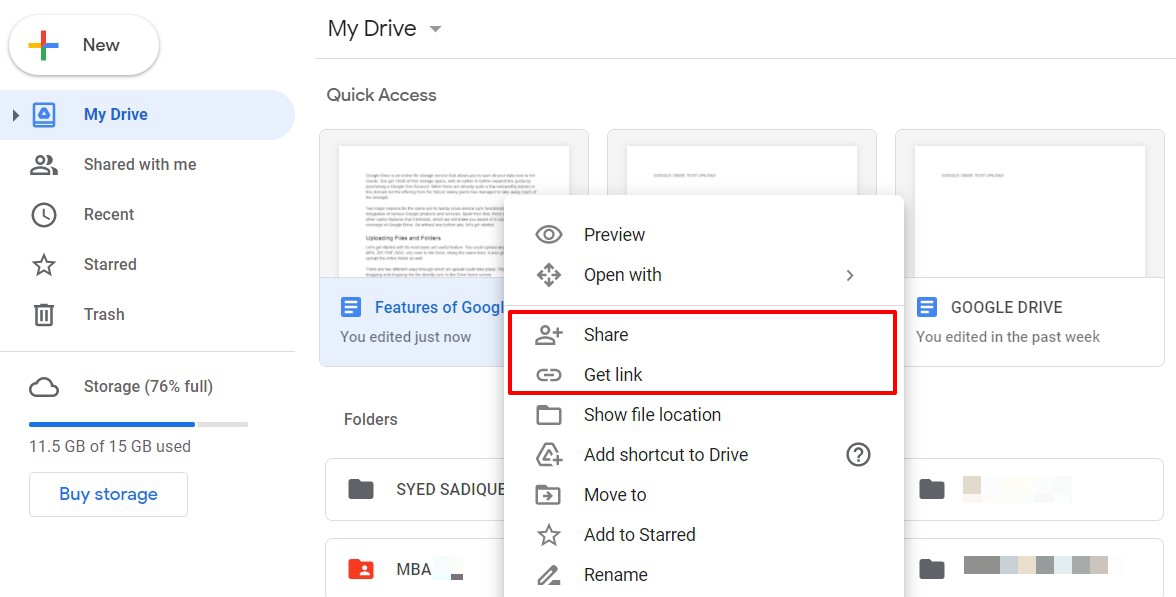
To begin with, right-click on any file and you shall see two options: Share and Get Link. While both these features could be used interchangeably as well, let’s keep that aside and focus on their standalone functions.
Share
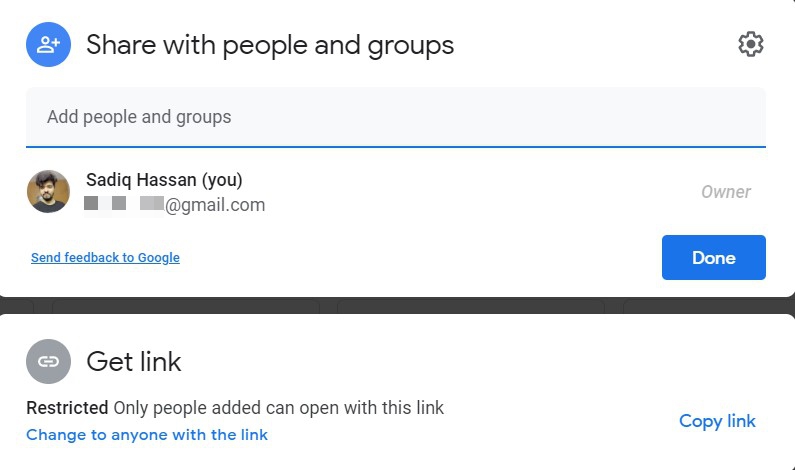
It is used if you wish to share a file with a limited number of users, and when you have the email address for each of these recipients. Once you select this option, a dialog box will appear, where you need to enter the receiver’s email address. Likewise, you could also type in a short note about the file being sent, in the description box.
Now before you hit the Send button, there’s another thing worth discussing. As you might have noticed, the recipient has been designated the role of the Editor. This means that you have given them the authority to make changes to this file (which will be reflected on your end as well).
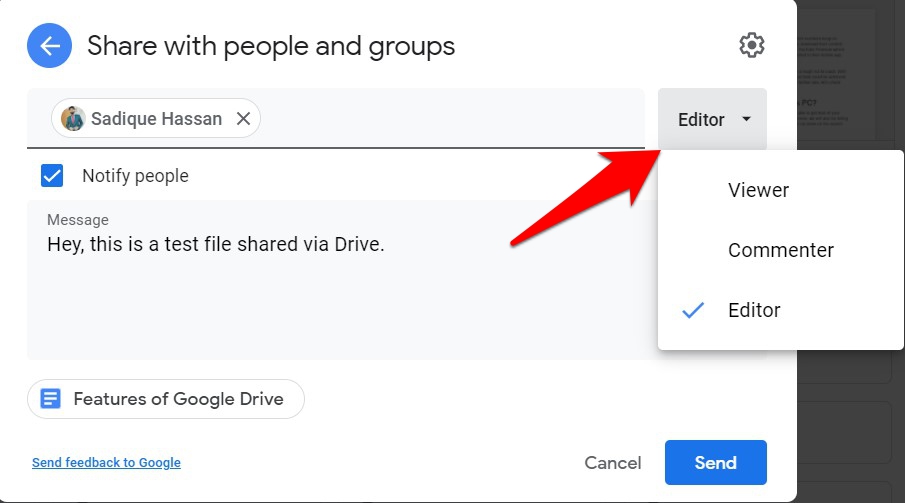
However, if you wish to limit this authority, then click on the Editor keyword and you shall see two new roles: Viewer and Commentor. As is evident from their names, a Viewer could only view the file, but cannot comment on it or edit it. On the other hand, a Commentor could view the file as well as provide some feedback as well.
Do keep in mind that the Viewer could view these comments as well, it’s just that they cannot add their comments. Anyway, once you have decided the role, typed in the message (optional), and added the recipient email address, you may now hit the Send button.
Get Link
This feature comes in handy when you don’t know the email address of the recipient or wish to make the file available to a wider audience. So as soon as you right-click on a file and select Get Link, Drive will create a shareable link. You could now copy it and share it via the medium of your choice. But before that, let’s understand its permission.
By default, it’s set to Restricted. It means that only the users whose email ID you have entered under the Share section will be able to access the content of this file. However, if you wish to make this file available for everyone, then click on Restricted and select Anyone with the link.
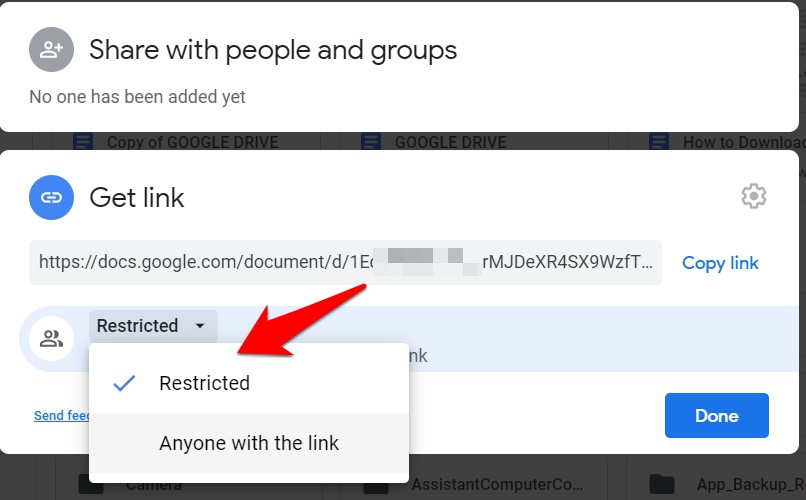
By default, everyone will be assigned the Viewer Role, and this is the safest approach because the file is now accessible by anyone with the link. However, you also have the option to tweak this setting and give the user a role of a Commentor or Editor.
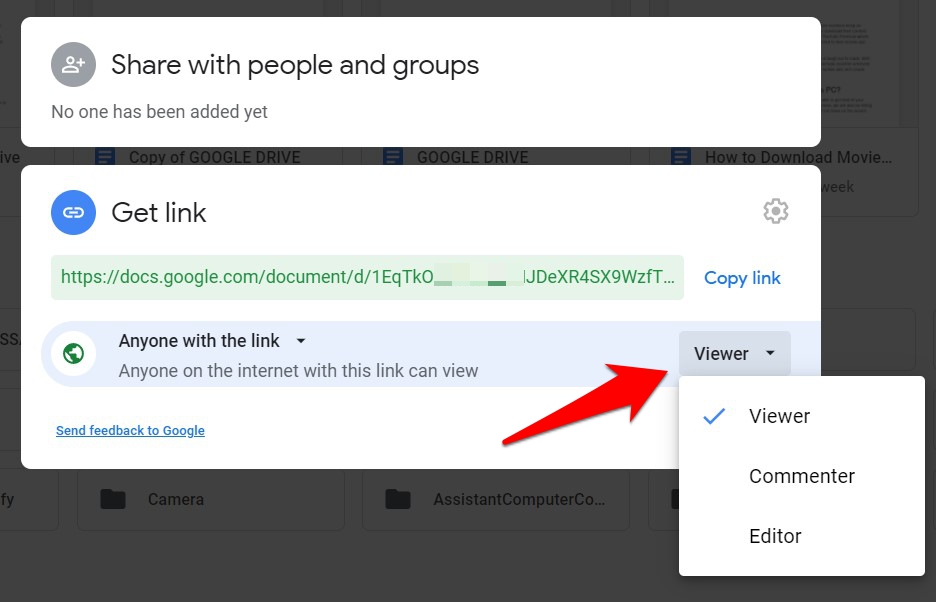
As explained before, the former will be able to add their valuable comments, apart from the ability to view the file. Whereas the Editor could even make changes to the file, apart from all the privileges of a Viewer and Commentor.
File Access Permissions
Now that you are aware of the differences between Share and Get Link as well as the various user permissions, there’s another related topic of discussion that deserves your attention.
There are two permissions messages that you, as a user (and not the owner of the file), could come across. These are the “You Need Access” and “Request Edit Access” messages. Let’s try and understand both of them.
You Need Access
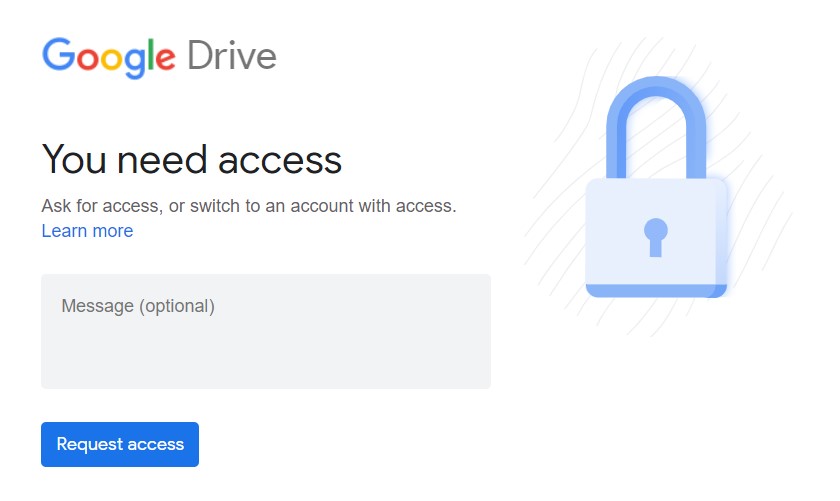
You will see this message when you click on a file shareable link that hasn’t been shared with you. In that case, you just need to request access to this file from its owner. For that, type in a message (optional but recommended) explaining why you need this file and hit the Request Access message.
Request Edit Access
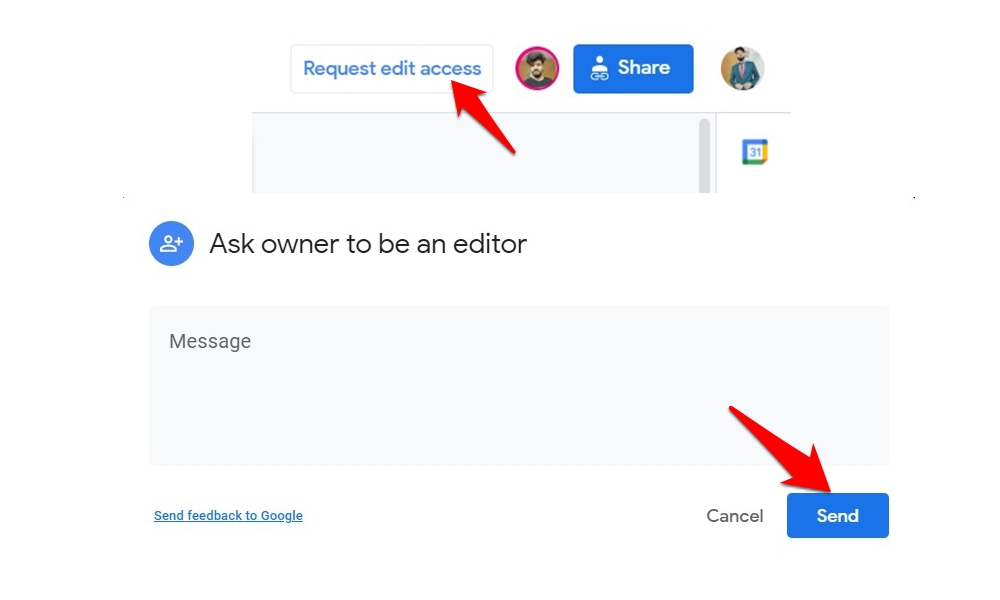
You will come across this message when you are trying to make changes to a file but in fact, you are only assigned the role of a Viewer. So click on the Request Edit Access message, draft in the reason as to why you need to role of the Editor, and hit the Send button.
Downloading Files
Downloading a file takes two different approaches, depending on whether you are the owner of that file or a user.
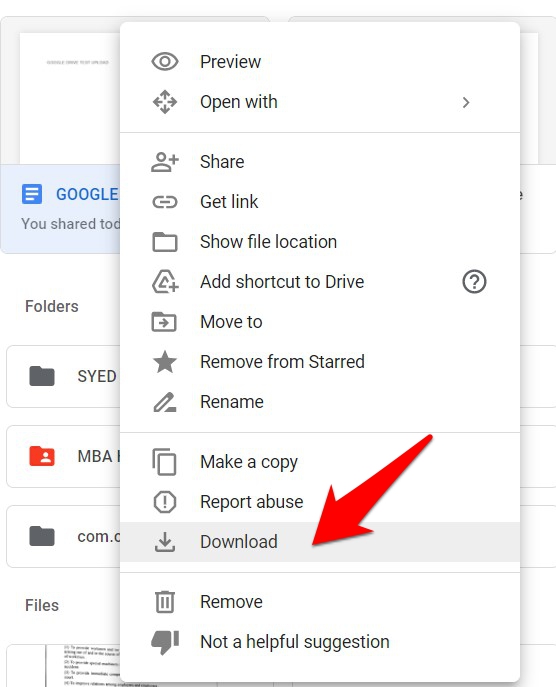
In case you have uploaded the file, then just head over to that file in Google Drive, right-click on it, and select Download.
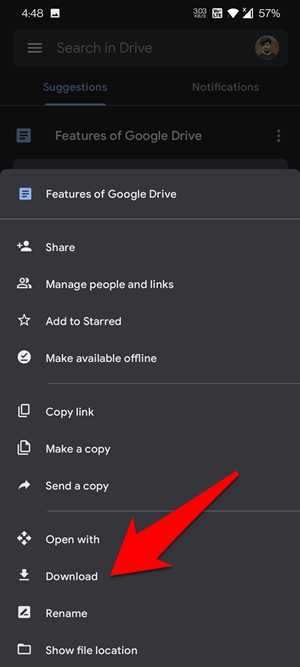
If you are on your smartphone, then tap on the overflow icon situated next to the file and select Download.
Now, if you are a user and the owner has shared the link with you, or you have access to a link that has been made accessible to everyone, then just click on that link. The browser shall open that file in the preview window. Then click on the overflow icon situated at the right and select the Download option.
![]()
However, if you have got hold of a file download link that hasn’t been shared with you, then you will be greeted with the Request Access or You Need Access message, depending on the scenario, But in both these cases, you will need access from the owner before you could download that file.
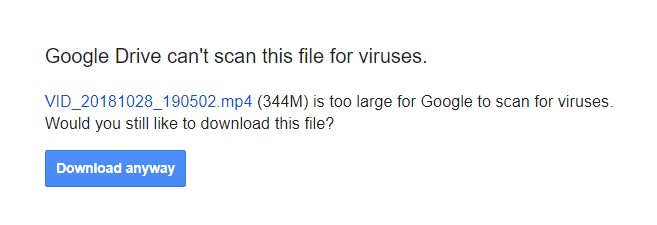
Furthermore, since we are talking about downloads, Google Drive comes with a built-in FIle Scanner. Any file smaller than 100MB will automatically be scanned by Drive and shall notify you if it is safe to download or not. For files exceeding this limit, Drive wouldn’t scan the file and instead show this message:
Use Drive Files Offline
Unknown to many, you could access, view, and edit Google Docs, Sheets, and Slides files in an offline mode, directly from Drive. But since you already have an option of manually downloading files onto your PC, why would one need this feature?
Well, any changes that you make to the files that are locally stored on your device will only be visible to you. On the other hand, if you make use of Drive’s offline feature, then the changes you make to the files while offline will automatically be reflected in all the shared users’ accounts as and when you’re back online.
- To try it out, head over to the Chrome Web Store and install the Google Docs Offline extension.

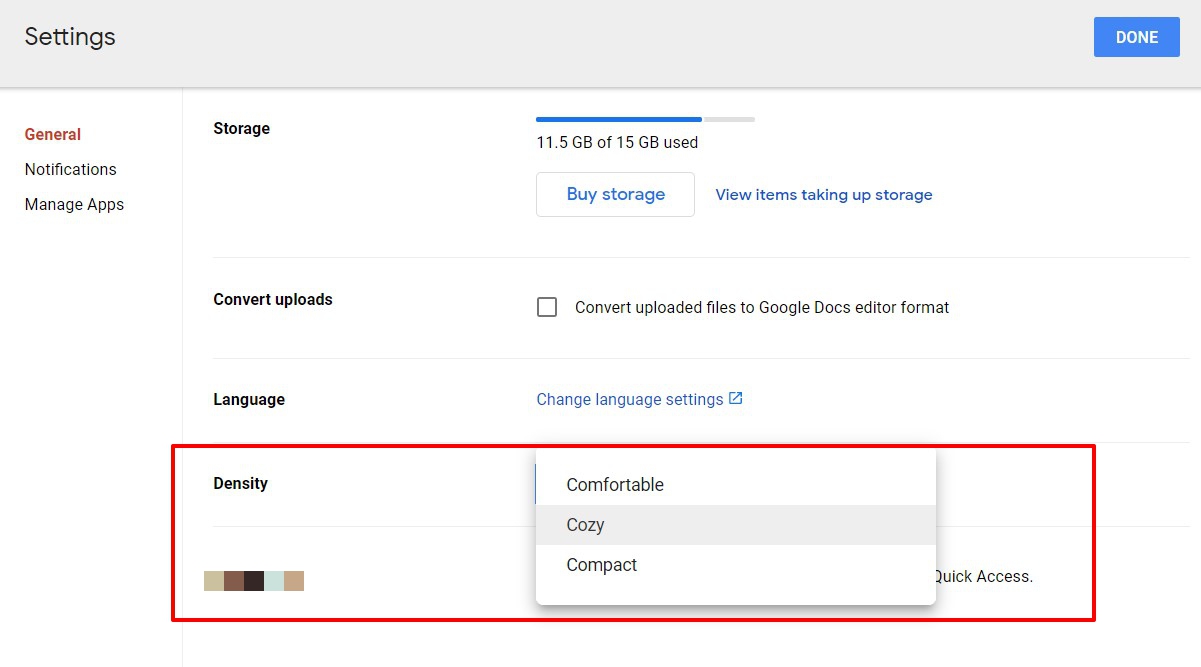
- Then go to the Drive Settings menu > General and scroll to the Offline section. Checkmark the option next to Offline (Create, open, and edit…)
- Now to make a file available for offline usage, right on that file and select Available Offline.
- To access these files in offline mode, just click on Ready for offline followed by Offline Preview.
- You could now easily view and make changes to the file and when you go back online, the changes will be reflected for others as well.
Google Drive’s Backup and Sync App
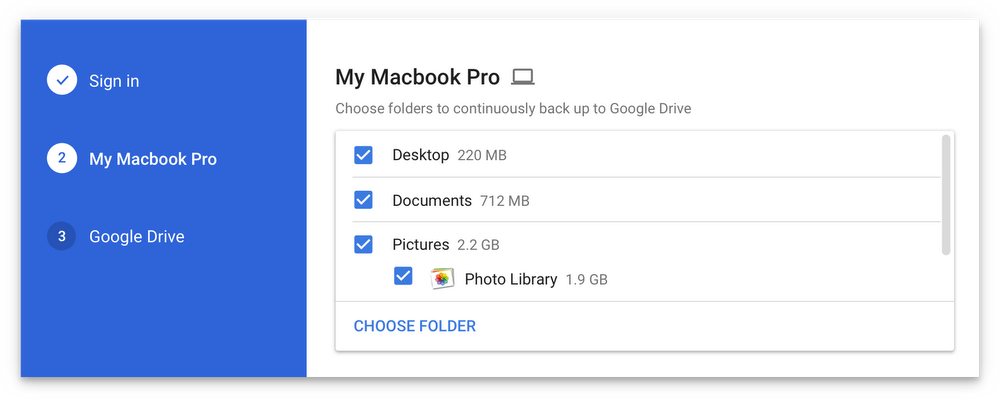
This coverage would have been incomplete without introducing Backup and Sync. This is an app for Mac and Windows platforms that allows you to backup all your files and data from your PC over to Drive.
Likewise, you could also sync the Drive files onto your PC and could access them as and when required. Any changes you make to either of the two will be reflected across the other. For example, if you edit a Doc file on your PC, then those changes will automatically be synced in real-time over to the file stored on Drive as well.
- To try it out, download the app for your PC.
- Once downloaded, launch it via its installbackupandsync.exe file.
- Now sign in with your Google ID, choose the sync settings, and hit Next.
- You may now start uploading local files to Drive or access Drive files directly from your PC’s File Explorer.
Create a Copy of Files
If you wish to have two or more instances of a file, then you don’t need to re-upload the files. Rather Google Drive comes with an inbuilt option that will create a carbon copy of that file for you. To try it out, right-click on the file and select Make a Copy. The second instance of that file will be created which could be accessed from all the linked devices.
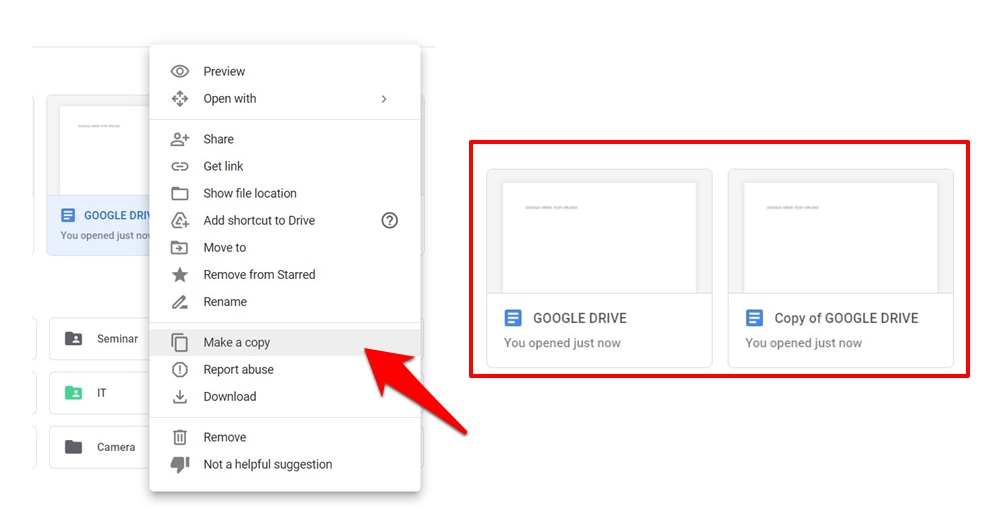
Now comes the question as to why you would need this feature? Well, this will come in handy if you wish to allocate different permissions to the different sets of users, but for the same file! For example, you could share a file with one user and permit them to just view that file. And then share the carbon copy of that file with another user, giving them the Editor’s access.
Star Important Files
Since your Drive might already be filled with a plethora of files and folders, finding the right ones might take ages. One way is to use the Search box and manually type in the desired file name. However, that would call for a lot of effort.
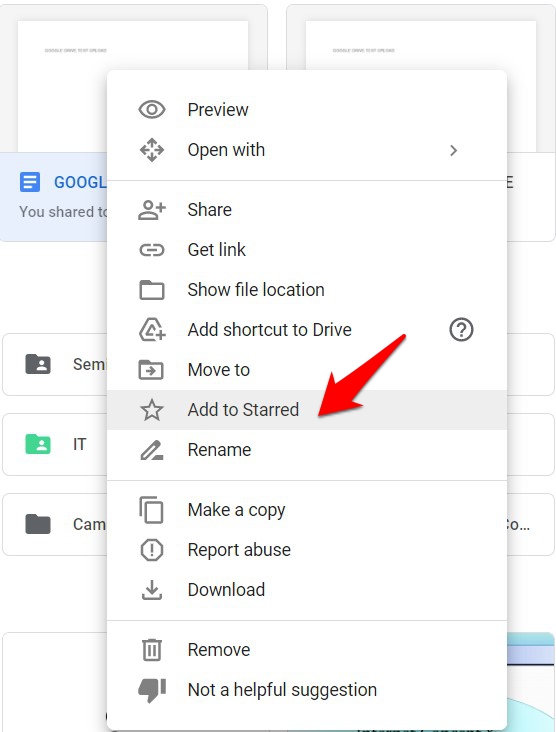
An easier approach would then be to add a star to these files. Doing so will send these files to a separate section which could be accessed as and when required. To try it out, right-click on the file and select Add to Starred.
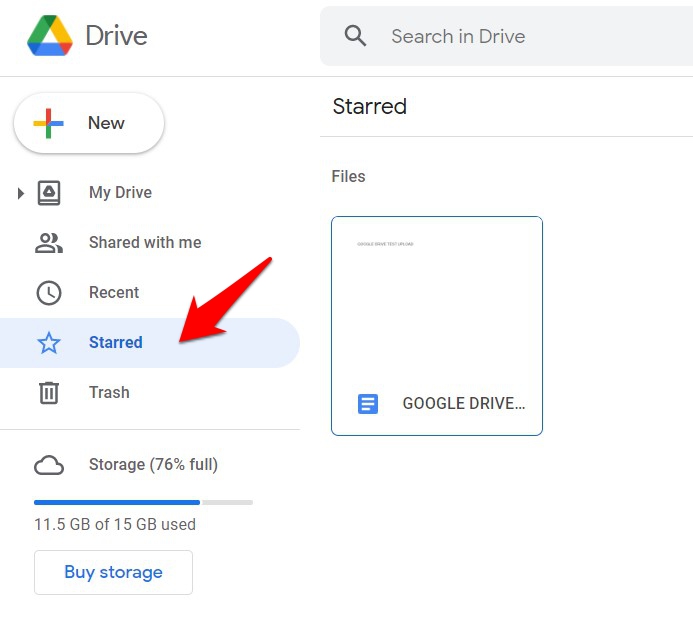
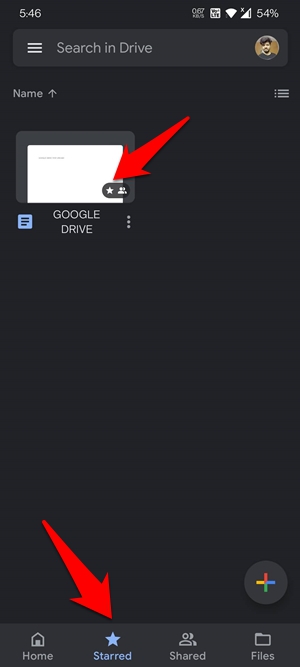
You could now access this file via the Starred section situated at the left menu bar, or via the Starred section from the bottom menu bar on your smartphone.
Delete Files from Drive
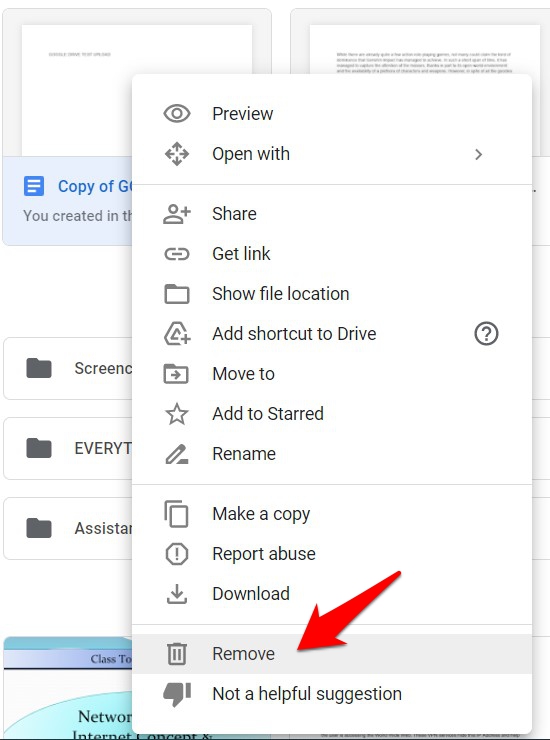
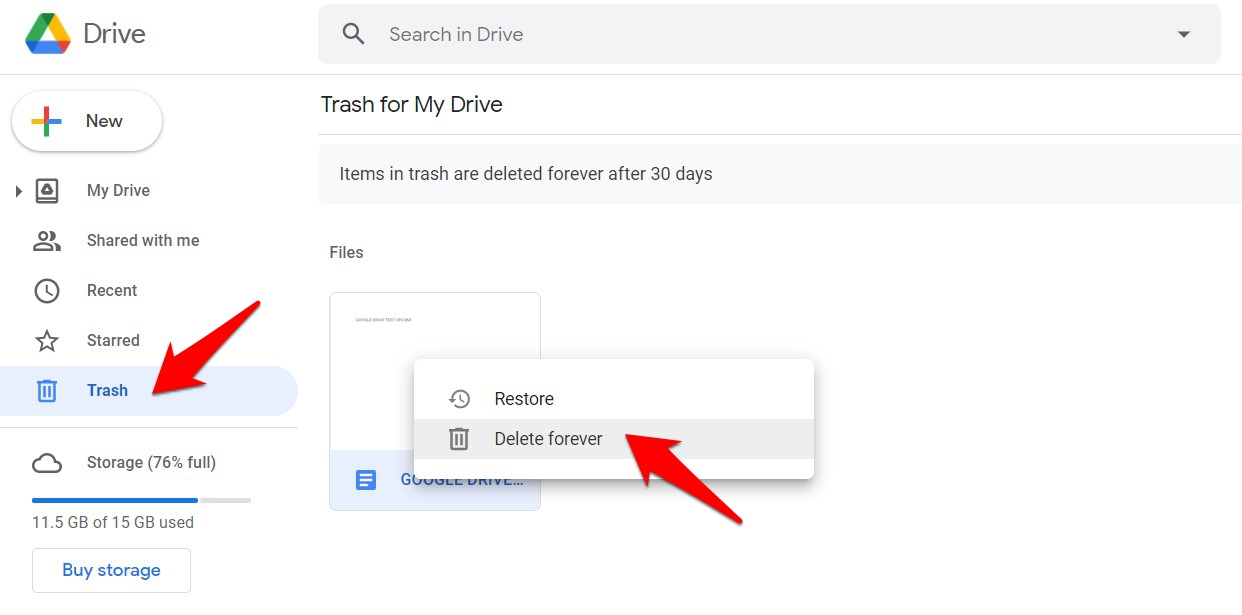
If you no longer need a file/folder, then it’s better to delete them and free up the storage space. To do so, right-click on the file and select Remove. However, the file isn’t completely deleted from your Drive. Rather it would be sent to Trash for 30 days.
During this time frame, you could also restore this file if required. However, if you don’t wish to wait for a lengthy time frame but rather wish to permanently bid adieu to this file, then head over to the trash section of Drive, right-click on it, and select Delete Forever.
Integrate Drive with other Apps
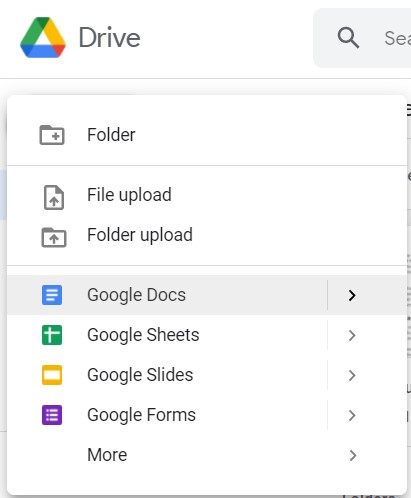
By default, all the Google Office Suite apps such as Docs, Sheets, Forms are already integrated with Drive. You only need to sign in across all these services with the same Google account and then you could easily access them right from Drive itself.
You could even start a new instance of any of these files right from Drive itself. To do so, click on New and select the app of your choice.
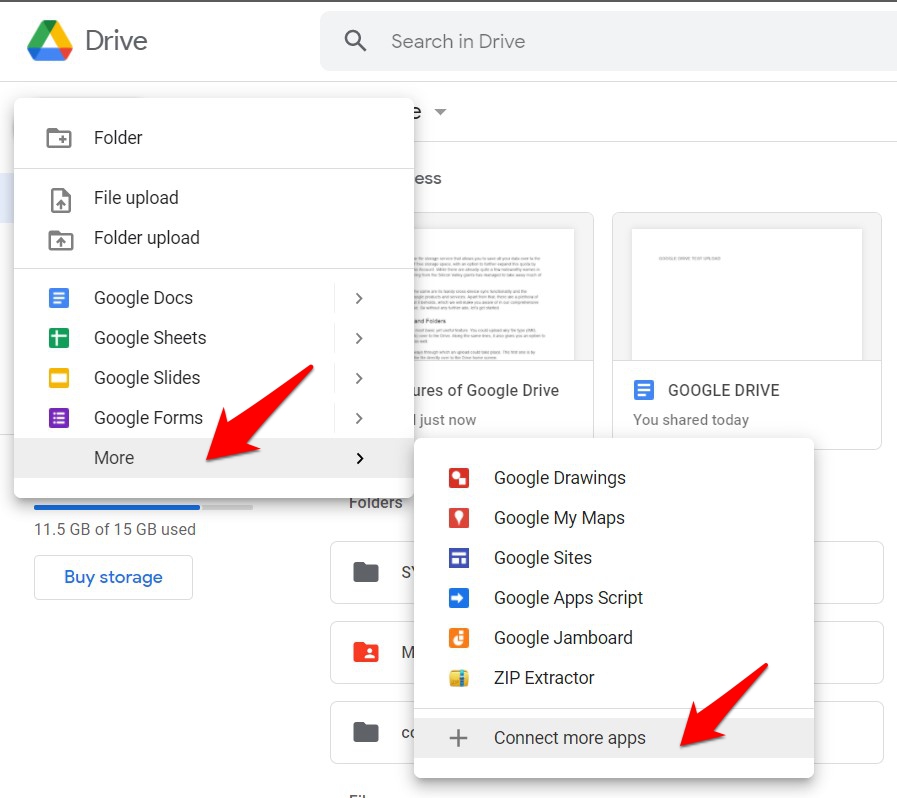
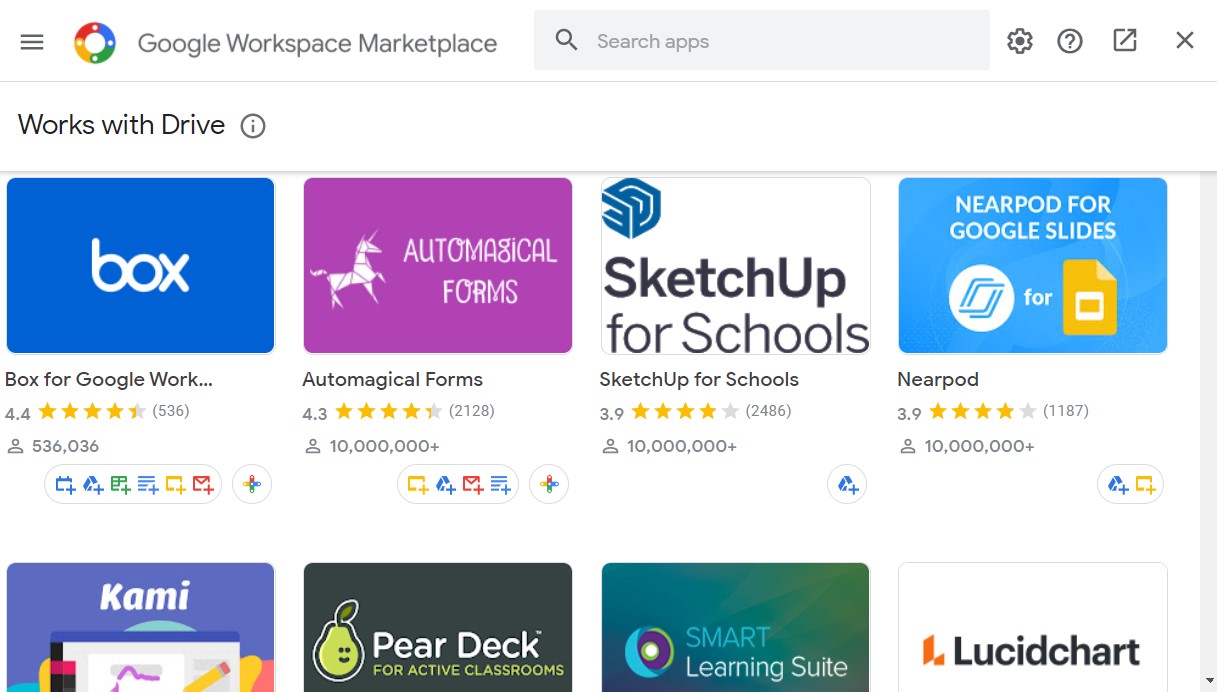
Moreover, there’s also an option to add non-Google apps and services to Drive. To try them out and then integrate them to Drive, click on New > More > Connect More Apps.
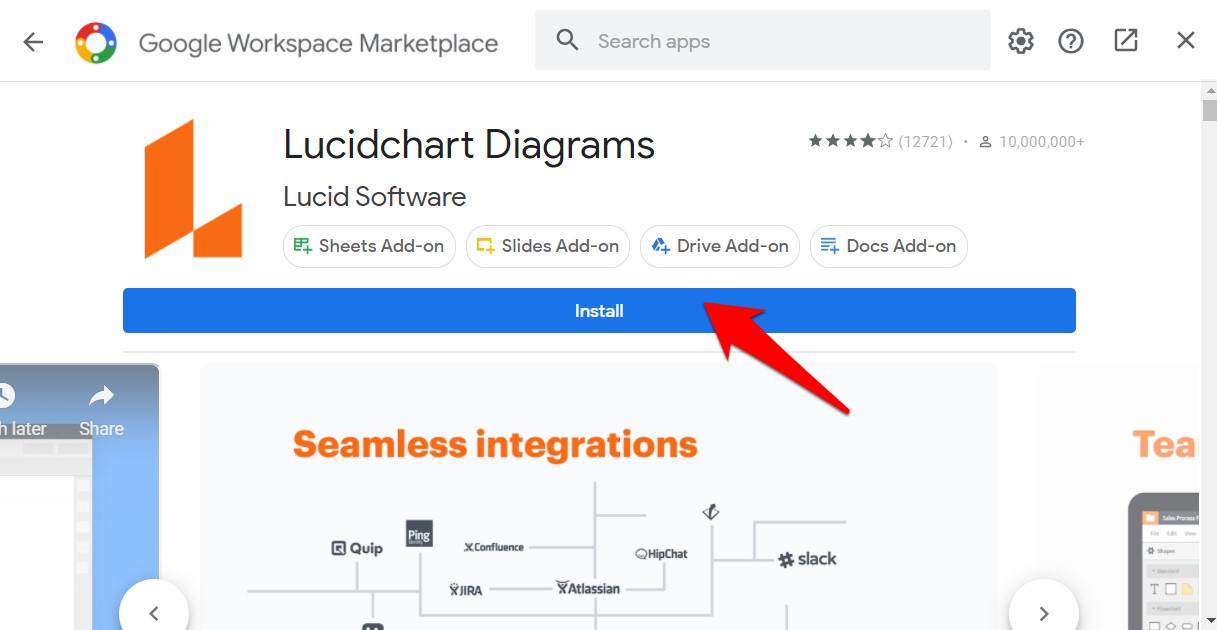
You shall not be taken to the Add-on store. Select one of your choices and hit Install, that app will now be integrated to Drive. Do keep in mind that you should only install apps from trustworthy sources, as these add-ons might be able to read and access all the files stored on your Drive.
Managing App Permissions
Since we are discussing apps, there’s another important aspect that we would like to draw your attention towards. You have the option to view, disable or delete data of all the apps that have access to your Drive account, right from its dashboard itself.
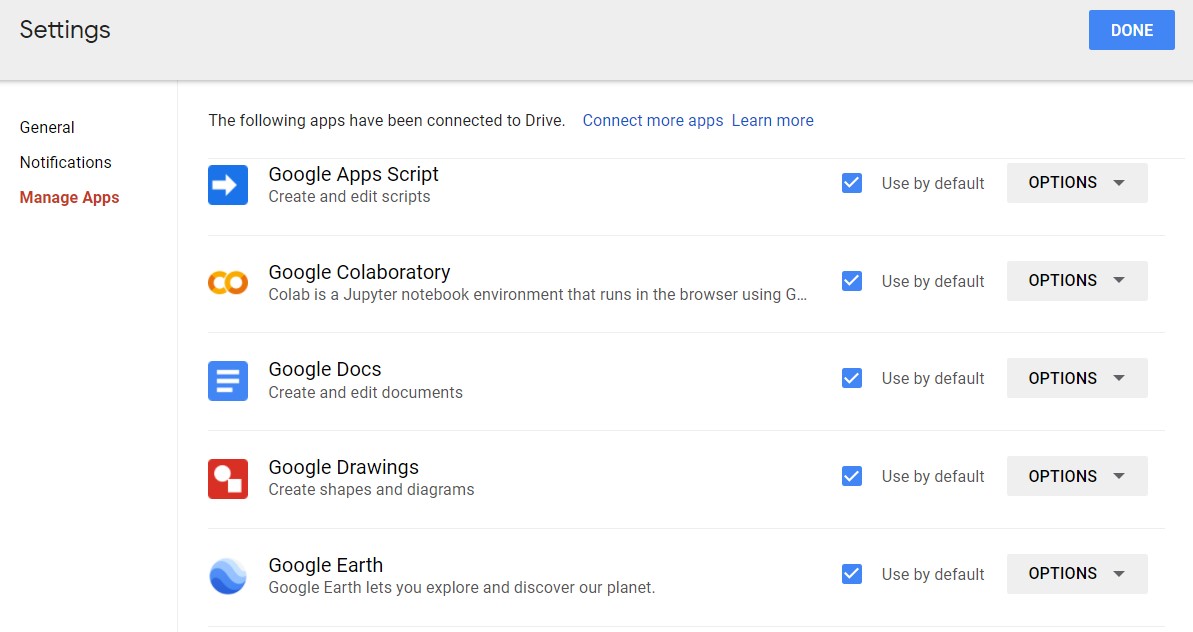
These apps aren’t just related to the add-ons, but could also encapsulate all the apps (including Android apps) that have been given access to your Drive account at any point in time. To effectively manage them, head over to Settings and go to the Manage App section. You could now tweak the permission of all the integrated apps as per the need.
Customize Drive
While this file storage service isn’t known for its customizations, but there are some useful UI tweaks that you could try out. For example, you could assign different colors to different folders to make them easily distinguishable from others.
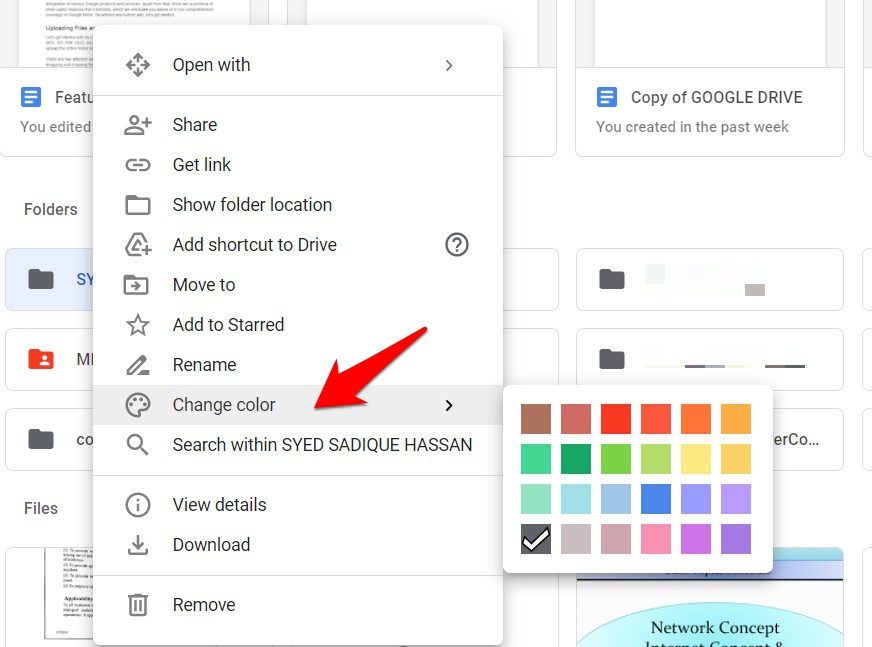
For that, right-click on the desired folder and select Change Color from the menu. Now just assign the color of your choice and the tasks stand complete. You may also stroll to the Google MarketPlace and search for add-ons belonging to this domain.
Furthermore, you may also change the default view type of Drive. For that, head over to Settings > General and scroll to the Density section. From there, you may select either Comfortable, Cozy, or Compact.

Conclusion
So this was all from this comprehensive guide on Google Drive. The fact that it beholds such a plentitude of nifty and useful functionalities makes it all the more clear why it has been the preferred choice for the userbase.
What are your views on this? Does this offering from Google manage to checkmark your prerequisites, or it tends to fall short in some aspects? Do let us know your opinions about the same in the comments section below.
Need the Google Drive App to download